Showing posts with label Widgets. Show all posts


Tip: Copy the code given give below and paste it inside this editor.
fb fan page with timer

Adding Popup For Facebook Like Box With Timer (Updated!)

You just need to place a code to your blog widget Follow following steps to add Popup For Facebook Like Box With Timer to WordPress and Blogger.
Adding To Blogger
  1. Go To Blogger > Design > Edit HTML
  2. Backup your template
  3. Paste the following code just above </body>
Adding To WordPress
  1. Go to Dashboard > Appearance > Editor > Header.php
  2. Paste the following code just above </body>
<style>#fblikepop {    background-color: #fff;
    display: none;
    position: fixed;
    top: 200px;
    _position: absolute;
 /* hack for IE 6*/
    width: 450px;
    border: 10px solid #6F6F6F;
    z-index: 200;
    -moz-border-radius: 9px;
    -webkit-border-radius: 9px;
    margin: 0pt;
    padding: 0pt;
    color: #333333;
    text-align: left;
    font-family: arial,sans-serif;
    font-size: 13px;
}#fblikepop body {
    background: #fff none repeat scroll 0%;
    line-height: 1;
    margin: 0pt;
    height: 100%;
}

.fbflush {
    cursor: pointer;
    font-size: 11px !important;
    color: #FFF !important;
    text-decoration: none !important;
    border: 0 !important;
}
#fblikebg {
    display: none;
    position: fixed;
    _position: absolute;
 /* hack for IE 6*/
    height: 100%;
    width: 100%;
    top: 0;
    left: 0;
    background: #000000;
    z-index: 100;
}#fblikepop #closeable {
    float: right;
    margin: 7px 15px 0 0;
}#fblikepop h1 {
    background: #6D84B4 none repeat scroll 0 0;
    border-top: 1px solid #3B5998;
    border-left: 1px solid #3B5998;
    border-right: 1px solid #3B5998;
    color: #FFFFFF !important;
    font-size: 14px !important;
    font-weight: normal !important;
    padding: 5px !important;
    margin: 0 !important;
    font-family: "Lucida Sans Unicode", "Lucida Grande", sans-serif !important;
}#fblikepop #actionHolder {
    height: 30px;
    overflow: hidden;
}#fblikepop #buttonArea {
    background: #F2F2F2;
    border-top: 1px solid #CCCCCC;
    padding: 10px;
    min-height: 50px;
}#fblikepop #buttonArea a {
    color: #999999 !important;
    text-decoration: none !important;
    border: 0 !important;
    font-size: 10px !important;
}#fblikepop #buttonArea a:hover {
    color: #333 !important;
    text-decoration: none !important;
    border: 0 !important;
}#fblikepop #popupMessage {
    font-size: 12px !important;
    font-weight: normal !important;
    line-height: 22px;
    padding: 8px;
    background: #fff !important;
}#fblikepop #counter-display {
    float: right;
    font-size: 11px !important;
    font-weight: normal !important;
    margin: 5px 0 0 0;
    text-align: right;
    line-height: 16px;
}</style>
<script src="http://www.google.com/jsapi"></script><script>google.load("jquery", "1");</script>
<script type="text/javascript" src="http://connect.facebook.net/en_US/all.js#xfbml=1"></script>
<script type="text/javascript">
//<![CDATA[
 kakinetworkdotcom01username="android-blogstuff",
 kakinetworkdotcom01title="Join us at Facebook!",
 kakinetworkdotcom01skin="04",
 kakinetworkdotcom01time="20",
 kakinetworkdotcom01wait="0",
 kakinetworkdotcom01lang="en"
//]]>
</script>
<script type="text/javascript" src="http://allbloggingtips.com/wp-content/uploads/2012/06/popup-with-timer-codez.js"></script>
<script type="text/javascript">
//<![CDATA[
 $(document).ready(function(){$().kakinetworkdotcom({ closeable: true });});
//]]>
</script>

Make following important changes:

  • Replace this AllBloggingTips with your Facebook username.
  • The timer is set to 20 seconds to change it simply edit timeout: 20
  • The widget appears immediately after a visiter enter your blog/site. If you want it to appear after one minute or more then edit wait: 0
Read More ...

1 comments


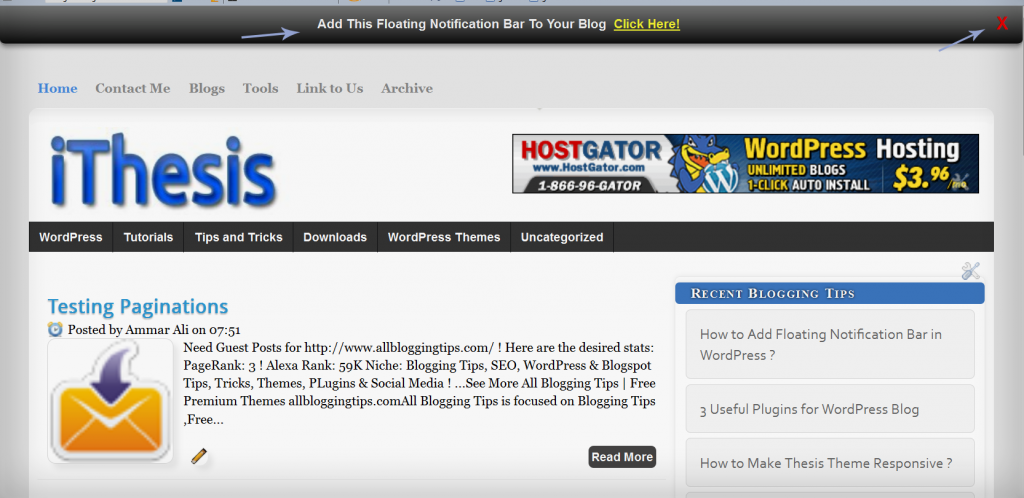
Add Cool Floating Notification bar in Blogger !

First  Always Back Up Your Template Before You Any Make Changes – How To Back Up A Blogger Template
  • Goto Blogger  => Design => Edit HTML
  • Next search for this code
<body>
  •   Just below it paste the following code,
<!-- Notification code start -->
<style type='text/css'>
#ut-sticky
{
background: #7d7e7d; /* Old browsers */
background: -moz-linear-gradient(top,  #7d7e7d 6%, #7d7e7d 9%, #0e0e0e 99%); /* FF3.6+ */
background: -webkit-gradient(linear, left top, left bottom, color-stop(6%,#7d7e7d), color-stop(9%,#7d7e7d), color-stop(99%,#0e0e0e)); /* Chrome,Safari4+ */
background: -webkit-linear-gradient(top,  #7d7e7d 6%,#7d7e7d 9%,#0e0e0e 99%); /* Chrome10+,Safari5.1+ */
background: -o-linear-gradient(top,  #7d7e7d 6%,#7d7e7d 9%,#0e0e0e 99%); /* Opera 11.10+ */
background: -ms-linear-gradient(top,  #7d7e7d 6%,#7d7e7d 9%,#0e0e0e 99%); /* IE10+ */
background: linear-gradient(top,  #7d7e7d 6%,#7d7e7d 9%,#0e0e0e 99%); /* W3C */
filter: progid:DXImageTransform.Microsoft.gradient( startColorstr=&#39;#7d7e7d&#39;, endColorstr=&#39;#0e0e0e&#39;,GradientType=0 ); /* IE6-9 */

border-bottom:2px solid #999;

color:#fff;
text-align: center;
margin:-12px auto;
padding-bottom:1px;
border-top: 1px solid #333;
height:38px;
font-size:13px;
position:fixed;
vertical-align: baseline; overflow:hidden;
z-index:999;
width:100%;
border-bottom-left-radius:6px;
border-bottom-right-radius:6px;
display:block;
font-weight: bold;
font-family: arial,&quot;Helvetica&quot;;
font-color:#fff;
 -moz-box-shadow: 0 2px 4px hsla(0,0%,0%,.35);
 -webkit-box-shadow: 0 2px 4px hsla(0,0%,0%,.35);
}
#ut-sticky:hover
{

background-color:#333;background-image:-moz-linear-gradient(top,#555555,#434343);background-image:-ms-linear-gradient(top,#555555,#434343);background-image:-webkit-gradient(linear,0 0,0 100%,from(#555555),to(#434343));background-image:-webkit-linear-gradient(top,#555555,#434343);background-image:-o-linear-gradient(top,#555555,#434343);background-image:linear-gradient(top,#555555,#434343);background-repeat:repeat-x;filter:progid:DXImageTransform.Microsoft.gradient(startColorstr=&#39;#555555&#39;,endColorstr=&#39;#434343&#39;,GradientType=0)

-webkit-transition:all 1.3s ease-in-out;-moz-transition:all 1.3s ease-in-out;-o-transition-duration:all 1.3s ease-in-out;transition:all 1.3s ease-in-out;

 -moz-box-shadow: 0 2px 4px hsla(0,0%,0%,.35);
 -webkit-box-shadow: 0 2px 4px hsla(0,0%,0%,.35);

}

#ut-button {background:#fff; padding:4px; color:black;text-shadow:0 -1px 0 rgba(255,255,255,0.25);background-color:white}

#ut-sticky p{line-height:5px; font-size:13px; text-align:center; width:95%; float:left;}
#ut-sticky p a{ text-decoration:underline; padding:4px; color:#FFFF33;}
.ut-cross{display:block; position:relative; right:15px; top:4px;float:right;}
.ut-cross a{font-size:18px; font-weight:bold; font-family:&quot;Arial&quot;; color:#FF0000; line-height:30px;}
.ut-cross, a:hover{color:#DDD; text-decoration:none;}

</style>
<div id='ut-sticky'>
<p style='padding-top:17px;'>Add This Floating Notification Bar To Your Blog <a class='ut-button' href='http://www.android-blogstuff.blogspot.com' target='_blank'>Click Here!</a></p>
<div class='ut-cross'><a href='javascript:hide_cross();'>X</a></div>
</div>
<script language='JavaScript'>
function hide_cross() {
crosstbox = document.getElementById(&quot;ut-sticky&quot;);
crosstbox.style.visibility = &#39;hidden&#39;;
}
</script>
<br/><br/>
<br/><br/>
<!-- End of Notification code, info - http://www.allbloggingtips.com -->
To Customize it
After adding above code just edit above HIGHLIGHTED text and link to your desire text.
I hope you enjoyed this cool Floating Notification bar widget. Do let me know if you face any problem.


Read More ...

0 comments

You can Install This Widget Easily in your Blog By Following These Simple Steps....

Before you edit any template it's better to keep a Backup..
So First Backup your Template. Now Go To Design>Edit Html>Select Expand Widgets...

Demo : Click Here 

Step 1 : The CSS You Need To Search The Following Piece Of Code By Pressing [Ctrl+F]

Read More ...

0 comments


In this article,I am going to explain how to add more attractive Subscribe Section + Search Box to your blogger blog.This subscribe section is included Feedburner feed and Email subscriptions boxes,Twitter and Facebook boxes for your Twitter and Facebook profiles and Social networking buttons(Digg,Twitter,Facebook,Stumbleupon,Delicious) to share your articles among social networks.These social network buttons are powered by www.addthis.com.Above the subscribe section,Search box is included.You don't want to change anything in the search box code.To add this widget to your blogger sidebar without doing any modification,sidebar width must be at least 305 px. You can add this Subscribe Section + Search Box into your blog within few seconds and very easy to configure.If you like to add this widget to your blog or a website,then follow the steps given below.
Attractive Subscribe Section + Search Box
1.Login to your blogger dashboard --> Design --> Edit HTML
2.Scroll down to where you see </head> tag .
3.Copy below code and paste it just before the </head> tag .

<style type="text/css">
.subbox{width:305px;border:0 solid #141414;overflow:hidden}
.addthis_toolbox{padding:15px 0 5px 0;text-align:center}
.addthis_toolbox .custom_images a{width:32px;height:32px;margin:0 4px 0 4px;padding:0}
.addthis_toolbox .custom_images a:hover img{opacity:1}
.addthis_toolbox .custom_images a img{opacity:0.85}
.rssbox{background:#f7f6f6;border:1px solid #ccd1d7;padding:5px 10px;margin:10px 0 0 0;-moz-border-radius:10px;-khtml-border-radius:10px;-webkit-border-radius:10px;border-radius:10px;width:125px}
.rssbox:hover{border:1px solid #92aed1}
.rssbox a{color:#7c8a9b;text-transform:uppercase;text-decoration:none;font:bold 12px Arial,Helvetica,Sans-serif}
.rssbox a:hover{color:#7c8a9b;text-decoration:underline}
.emailsbox{background:#f7f6f6;border:1px solid #ccd1d7;padding:5px 10px;margin:10px 0 0 0;-moz-border-radius:10px;-khtml-border-radius:10px;-webkit-border-radius:10px;border-radius:10px;width:125px}
.emailsbox:hover{border:1px solid #92aed1}
.emailsbox a{color:#7c8a9b;text-transform:uppercase;text-decoration:none;font:bold 12px Arial,Helvetica,Sans-serif}
.emailsbox a:hover{color:#7c8a9b;text-decoration:underline}
.twitterbox{background:#f7f6f6;border:1px solid #ccd1d7;padding:5px 10px;margin:10px 0 0 0;-moz-border-radius:10px;-khtml-border-radius:10px;-webkit-border-radius:10px;border-radius:10px;width:125px}
.twitterbox:hover{border:1px solid #92aed1}
.twitterbox a{color:#7c8a9b;text-transform:uppercase;text-decoration:none;font:bold 12px Arial,Helvetica,Sans-serif}
.twitterbox a:hover{color:#7c8a9b;text-decoration:underline}
.facebookbox{background:#f7f6f6;border:1px solid #ccd1d7;padding:5px 10px;margin:10px 0 0 0;-moz-border-radius:10px;-khtml-border-radius:10px;-webkit-border-radius:10px;border-radius:10px;width:125px}
.facebookbox:hover{border:1px solid #92aed1}
.facebookbox a{color:#7c8a9b;text-transform:uppercase;text-decoration:none;font:bold 12px Arial,Helvetica,Sans-serif}
.facebookbox a:hover{color:#7c8a9b;text-decoration:underline}
#search{width:290px;padding:2px 2px;background:#f7f6f6;border:1px solid #ccd1d7;height:28px;margin-top:0;margin-left:5px;display:inline;float:left}
#search:hover{border:1px solid #92aed1}
#search form{margin:0;padding:0}
#search fieldset{margin:0;padding:0;border:none}
#search p{margin:0;font-size:85%}
#s{width:200px;margin:0 0 0 0;padding:5px 5px 5px 5px;border:none;font:normal 80% &quot;Tahoma&quot;,Arial,Helvetica,sans-serif;color:#000;float:left;background:#f7f6f6;display:inline}
input#searchsubmit{float:right;display:inline;margin:0 0 0 0;height:28px;background:#b2b2b2;color:#000;border:0 solid #222}
</style>
Save your template.
4.Now go to Design --> Page Elements and click on "Add a gadget".
5.Select "html/java script" and add the code given below and click save.
<div class="subbox">
<div id='search' style='display:inline;'>
<form action='/search' id='searchform' method='get'>
<input id="s" name="q" onblur="if (this.value == &quot;&quot;) {this.value = &quot;Search...&quot;;}" onfocus="if (this.value == &quot;Search...&quot;) {this.value = &quot;&quot;;}" type="text" value="Search..." />
<input id="searchsubmit" type="submit" value="Search" />
</form>
</div>
<table><tr>
<td><div class="rssbox">
<a href="http://feeds.feedburner.com/FEEDBURNER-ID" target="_blank" rel="nofollow"><img src="https://blogger.googleusercontent.com/img/b/R29vZ2xl/AVvXsEjUAt42ikzQG72H3eCzfKy-tpy-TATr_-2t3jT1SZDRWoWlrPIYOJnI0Kq7aDRx3JbONXBDFQPPG1QUS6J5gtT7dxKG5amT5HlkMdCiMcKHmi0ChDP7-Jd5tRACnQf3d3N0qZPzHCbfaj53/"  alt="RSS Feed" title="RSS Feed" style="vertical-align:middle; margin-right: 5px;border:none;"  /></a><a href="http://feeds.feedburner.com/FEEDBURNER-ID" target="_blank" rel="nofollow">RSS Feed</a>
</div></td>
<td><div class="emailsbox">
<a href="http://feedburner.google.com/fb/a/mailverify?uri=FEEDBURNER-ID" target="_blank" rel="nofollow"><img src="https://blogger.googleusercontent.com/img/b/R29vZ2xl/AVvXsEiwzOPgYTLwwr0SHtXPe2-mK1bv2iUzsaWgu8OiNSZmShbHCvMlzOEJBEv7SBBN0AZDVzisgOHWmlvsSbKog0RoShTbQPaD8JWUvD6OsPbobJ8T58tIvlarO160_QnZGCW8JtSnxK6n1cgW/"  alt="EMail Feed" title="EMail Feed" style="vertical-align:middle; margin-right: 5px;border:none;"  /></a><a href="http://feedburner.google.com/fb/a/mailverify?uri=FEEDBURNER-ID" target="_blank" rel="nofollow">EMail Feed</a>
</div></td>
</tr><tr>
<td><div class="twitterbox">
<a href="http://twitter.com/TWITTER-USERNAME" target="_blank" rel="nofollow"><img src="https://blogger.googleusercontent.com/img/b/R29vZ2xl/AVvXsEhOLVNxHveH5xQH8z1rJ5IQxynidQvEPVY5FSTdIpYei5bPZ7S4ZyO03cf48ZzWBF0fxT7qIPBXvLXCy0KICbb3dn_8Ywtt0U62aAmQXnFpCUs3Ib6sgaVWjDbG-HyVXIJ0tAbrV9Rnz_tf/"  alt="Twitter" title="Twitter" style="vertical-align:middle; margin-right: 5px;border:none;"  /></a><a href="http://twitter.com/TWITTER-USERNAME" target="_blank" rel="nofollow">Twitter</a>
</div></td>
<td><div class="facebookbox">
<a href="http://www.facebook.com/FACEBOOK-USERNAME" target="_blank" rel="nofollow"><img src="https://blogger.googleusercontent.com/img/b/R29vZ2xl/AVvXsEggRUT9DYocDDNcDnTFZIdMSq7jXYk8szue3ycytoKR4VzXEq4vJyXrtvEi7eGGhuQJRfl_YAPb4qLKcqVJYeoshCtgPg1a-3CJl79jNt1N9PgpWtJ0Uar76pR4cOVEKv8_jKzeNP2Xcv_c/"  alt="Facebook" title="Facebook" style="vertical-align:middle; margin-right: 5px;border:none;"  /></a><a href="http://www.facebook.com/FACEBOOK-USERNAME" target="_blank" rel="nofollow">Facebook</a>
</div></td>
</tr></table>
<p style="display:none;" align="center">Widget by <a href="http://www.bloggertipandtrick.net/" target="_blank">Blogger Tips And Tricks</a></p>
<div class='addthis_toolbox'>
<div class='custom_images'>
<a class='addthis_button_twitter'><img alt='Twitter' height='32' src='https://blogger.googleusercontent.com/img/b/R29vZ2xl/AVvXsEh44N08H6KEXGCVZmJ7d_5jHUX3IJVg0zvuFNRq7ALwAYU7NbMlh-KMLfBDnCkXcZlKopbHsLV0Xpc583fbmrNZCrubf4sE0o5BPWZ7nCREnr6FWI3GbRCKa5cYunnAacwXPvu6pZc9j-Q/' width='32'/></a>
<a class='addthis_button_delicious'><img alt='Delicious' height='32' src='https://blogger.googleusercontent.com/img/b/R29vZ2xl/AVvXsEhCw6B8k6nHft0_WT9eSIplfyS-JZiNrjuGzF8K6BYTb5GfWvMWUinRK5ymXBTbr7YTVAwoRcTKTTWy0C4mZullCAQ9t4_uWCuXMReSKbeoNoU9JTIACCAE1vnhkvnEnUDPPELzAAFLVHA/' width='32'/></a>
<a class='addthis_button_facebook'><img alt='Facebook' height='32' src='https://blogger.googleusercontent.com/img/b/R29vZ2xl/AVvXsEhJFbVbPu4Q7GGEam9-fWKrCWuHs-nLzD7W07PFRitZ8SVsG2UF4KCmVwZcIUNz19wQ6v1lYHVljsnQsRO641QI0cCJkgHBdIvfBaw_cp9qGOxVMSFm1Df1Bq07G9CZc1xF7CfF2GdVLIY/' width='32'/></a>
<a class='addthis_button_digg'><img alt='Digg' height='32' src='https://blogger.googleusercontent.com/img/b/R29vZ2xl/AVvXsEhuuWsdfqXrzLBmTg_yW2cdTzvtJGmEmjCfvEkGx6CZm2Owrh6hnFXvUYAhLMB3QOfr5WP08SF7lwo6jiWuj5QghzUICXkD3dPhEqfitzqRXMbB5rC2oiL7WVEA5JtzbNE_suws9rLukok/' width='32'/></a>
<a class='addthis_button_stumbleupon'><img alt='Stumbleupon' height='32' src='https://blogger.googleusercontent.com/img/b/R29vZ2xl/AVvXsEgAXZtkVR0y_JuCbSUjSRlUuUDj_Slzt2_AA52kYOFnH_sHOraUMJ0NvT4mmF6ExvPIqghiFlosgiXOdGDGrcs04vy9UMis9H6gUqpAa9HdRiOZczSKo3U_J4F1UbP7p9djTcQksVFmBjc/' width='32'/></a>
<a class='addthis_button_favorites'><img alt='Favorites' height='32' src='https://blogger.googleusercontent.com/img/b/R29vZ2xl/AVvXsEh2Y5IhwuWHy_LWO_VjQiu3m7c_knTDS1BBLPHjYk8OCP-IWps-Frc8tyx8akP1EWnvJ6ay-K43k37Huqsg5B31PVFyMg2mj8LZJQY4F-v9yHBhXUenOO6hHpNjQMhLWpZJldjS7xz30zc/' width='32'/></a>
<a class='addthis_button_more'><img alt='More' height='32' src='https://blogger.googleusercontent.com/img/b/R29vZ2xl/AVvXsEg2m7pFUWU9ET0xj3v8aH1NgQvzLtPsmeIxpi3HUK2FFLQqAy5WS33c0_Je3Lkk0emHpulC-CxLrANZN-fmLVRZLxOzkUjvKKulZcsNXwdxNMiTvZrjJoI_1h9gzs7q75t5BmXpHyQIFA8/' width='32'/></a>
</div>
<script src='http://s7.addthis.com/js/250/addthis_widget.js' type='text/javascript'/>
</div>
</div>
NOTE : Remember to Replace,
FEEDBURNER-ID with your real Feedburner ID.(4 times). TWITTER-USERNAME with your real Twitter username. FACEBOOK-USERNAME with your real Facebook username.
You are done.

Read More ...

0 comments


jQuery is the most popular java script library is used in today.it greatly simplifies java script programming.Here I listed most popular and very useful jQuery cheat sheet collection on the Internet,for anyone who like to learn jQuery.You can get more cheat sheets mentioned here as pdf files or image(.png,.jpeg) files.
jQuery is a fast and concise JavaScript Library that simplifies HTML document traversing, event handling, animating, and Ajax interactions for rapid web development. jQuery is designed to change the way that you write JavaScript.
From http://jquery.com/
1. jQuery 1.4.2 Visual Cheat Sheet
jQuery Visual Cheat Sheet, the refined and updated version of the popular woork's jQuery Cheat Sheet. The new edition includes all the reference you will ever need for jQuery 1.4.2 API!
jQuery 1.4.2 Visual Cheat Sheet
Article : http://woorkup.com/2010/06/13/jquery-1-4-2-visual-cheat-sheet/
Download : http://woorkup.com/wp-content/uploads/2010/06/jQuery-Visual-Cheat-Sheet-1.4.2.pdf
2. jQuery 1.4 Cheat Sheet
This cheet sheet attempts to better align with the new documentation structure jQuery is now using and clearly marks all new and updated functions for jQuery 1.4.
jQuery 1.4 Cheat Sheet
Article : http://labs.impulsestudios.ca/jquery-cheat-sheet
Download : http://labs.impulsestudios.ca/downloads/impulse_studios-jquery_cheat_sheet-1.0.pdf
3. jQuery Selectors
jQuery selectors are one of the most important aspects of the jQuery library. These selectors use familiar CSS syntax to allow page authors to quickly and easily identify any set of page elements to operate upon with the jQuery library methods. Understanding jQuery selectors is the key to using the jQuery library most effectively. This reference card puts the power of jQuery selectors at your very fingertips.
You must register(it is free) to get this cheat sheet.
jQuery Selectors
Article : http://refcardz.dzone.com/refcardz/jquery-selectors
4. jQuery 1.4.4 API Cheat Sheet
jQuery 1.4.4 API Cheat Sheet
Article : http://www.futurecolors.ru/jquery/
Download :
http://www.futurecolors.ru/jquery/jquery.cheatsheet.1.4.pdf
http://www.futurecolors.ru/jquery/jquery.cheatsheet.1.4.png
5. jQuery 1.3 cheat sheet wallpaper
jQuery 1.3 cheat sheet wallpaper
Article : http://www.gmtaz.com/jquery-13-cheatsheet-wallpaper/
6. jQuery Cheat Sheet - jQuery 1.3.2
jQuery Cheat Sheet - jQuery 1.3.2
Article : http://www.javascripttoolbox.com/jquery/cheatsheet/
7. jQuery Cheat Sheet - jQuery 1.1.3
jQuery Cheat Sheet - jQuery 1.1.3
Article : http://www.javascripttoolbox.com/jquery/cheatsheet/
8. jQuery - YUI3 Rosetta Stone
jQuery - YUI3 Rosetta Stone
Article : http://carlos.bueno.org/jq-yui.html#start
9. jQuery 1.3 Cheatsheet
jQuery 1.3 Cheatsheet
Article : http://blog.acodingfool.com/cheatsheets/jquery-1-3-cheatsheet/
10. jQuery 1.3 Visual Cheat Sheet
jQuery 1.3 Visual Cheat Sheet
Article : http://woork.blogspot.com/2009/09/jquery-visual-cheat-sheet.html
Download : http://www.scribd.com/doc/20161482/jQuery-Visual-Cheat-Sheet-by-WOORK
11. jQuery cheatsheet wallpaper
jQuery cheatsheet wallpaper
Article : http://chris4403.blogspot.com/2008/01/jquery-cheatsheet-wallpaper.html
Download :
http://cheatsheet.googlecode.com/svn/trunk/cheatsheet/src/jquery/jquery1.2-cheatsheet-1280-001.png
http://cheatsheet.googlecode.com/svn/trunk/cheatsheet/src/jquery/jquery1.2-cheatsheet-1280-002.png
12. jQuery 1.2 Cheat Sheet (colorcharge.com)
jQuery 1.2 Cheat Sheet (colorcharge.com)
Article : http://colorcharge.com/jquery/
13. jTouch – jQuery Cheat Sheet for iPhone
jTouch – jQuery Cheat Sheet for iPhone
Article : http://jtouch.colorcharge.com/
14. jQuery 1.2 Cheat Sheet
jQuery 1.2 Cheat Sheet
Article : http://www.gscottolson.com/weblog/2008/01/11/jquery-cheat-sheet/
Download : http://www.gscottolson.com/jquery/jQuery1.2.cheatsheet.v1.0.pdf
15. jQuery Selectors by codylindley.com
jQuery Selectors by codylindley.com
Article : http://codylindley.com/jqueryselectors/
Read More ...

1 comments


Yahoo Media Player is one of the easiest way to play audio files from your website or blog.It is very easy to embed into your site and only display when you click on the audio file name.Yahoo Media Player is not spend long time to load and someone can play all audio files of your website/blog using Play-list.
These are the main features of Yahoo Media Player:
  • Adds audio to your site with one line of HTML
  • Uses simple, easy-to-hack HTML instead of complicated proprietary markup, ushering in the REAL Media Web
  • Magical floating design never gets lost, is available when you need it, gets out of your way when you don't need it
  • Automatically finds all audio links on your page, turning your page into a playlist
  • Plays all your blog entries with a single button click
  • Allows you to put the play buttons where they belong: IN CONTEXT
  • Keeps the user in the page rather than sending them away to a media player
  • Picks up your images and adds them as cover art
  • Requires no download, install or maintenance
Yahoo Media Players
Follow these simple steps to embed Yahoo Media Player to your blog or website.
1.Login to your blogger dashboard--> Design - -> Edit HTML.
2.Scroll down to where you see </head> tag .
3.Copy below code and paste it just before the </head> tag .

<script type="text/javascript" src="http://mediaplayer.yahoo.com/js"></script>


4.Now save your template.
5.Go to Layout --> Page Elements.
6.Click on 'Add a Gadget'.
7.Select 'HTML/Javascript' and add the code given below (You can also add this code into Edit Html section of your Post Editor.):
<a href="DIRECT_URL_OF_YOUR_MP3-FILE">Name_Of_the_Mp3_File</a>
Note:
Replace "DIRECT_URL_OF_YOUR_MP3-FILE" with your .mp3 file direct url.
Replace "Name_Of_the_Mp3_File" with any name you like.
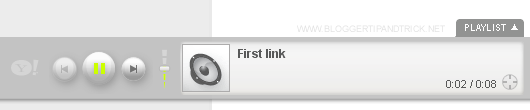
Look at the example given below:
<a href="http://mediaplayer.yahoo.com/example1.mp3">First link</a>
You can see more info about Yahoo Media Player from here : 
http://mediaplayer.yahoo.com/
.
Read More ...

0 comments


How To Add Cool Jquery Featured Slider to Blogger/Websites

1.Login to your blogger dashboard and go to Design --> Page Elements.

2.Click on 'Add a Gadget' on the sidebar.

3.Select 'HTML/Javascript' and add the one of code given below and click save.


<script src="http://ajax.googleapis.com/ajax/libs/jquery/1.4.2/jquery.min.js" type="text/javascript"></script>
<script src="http://nivo.dev7studios.com/scripts/nivo-slider/jquery.nivo.slider.pack.js" type="text/javascript"></script>
<script type="text/javascript"> 
$(window).load(function() { 
    $('#slider').nivoSlider(); 
}); 
</script>
<style> 
#slider { 
    position:relative; 
} 
#slider img { 
        position:absolute; 
    top:0px; 
    left:0px; 
    display:none; 
} 
#slider a { 
    border:0; 
    display:block; 
}
.nivo-controlNav { 
    position:absolute; 
    left:260px; 
    bottom:-42px; 
} 
.nivo-controlNav a { 
    display:block; 
    width:22px; 
    height:22px; 
    background:url(https://blogger.googleusercontent.com/img/b/R29vZ2xl/AVvXsEioxBO5nll_GF2CN46eDn4iyoizm8kSYCJIHz1clEfshznkdLZp76eOCO2BSeYBXzcaHuWrL4EQiOvVgW3hetMVv3G1AiTNP9FQzKemL0Szd7p5KSm6vG-U00INAO6PUa5fat2G7tJ7low/s400/bullets.png) no-repeat; 
    text-indent:-9999px; 
    border:0; 
    margin-right:3px; 
    float:left; 
} 
.nivo-controlNav a.active { 
    background-position:0 -22px; 
}
.nivo-directionNav a { 
    display:block; 
    width:30px; 
    height:30px; 
    background:url(https://blogger.googleusercontent.com/img/b/R29vZ2xl/AVvXsEisJNOlgl49RgLUlDoBfAHuJGa8UjC0_3_HXHW-kMQPK2I6D6AQiGfXwvUqtnA80CwtJymNFwbZh5qJH7spt6lUSA4gobztGcTyJhwr3LHg0ofyzUF6z37Vgq4stnvCGavxtOcT7brZwA8/s400/arrows.png) no-repeat; 
    text-indent:-9999px; 
    border:0; 
} 
a.nivo-nextNav { 
    background-position:-30px 0; 
    right:15px; 
} 
a.nivo-prevNav { 
    left:15px; 
}
.nivo-caption { 
    text-shadow:none; 
    font-family: Helvetica, Arial, sans-serif; 
    font-size:16px; 
    padding: 10px 0px; 
} 
.nivo-caption a { 
    color:#efe9d1; 
    text-decoration:underline; 
}
.clear { 
    clear:both; 
}
.nivoSlider { 
    position:relative; 
} 
.nivoSlider img { 
    position:absolute; 
    top:0px; 
    left:0px; 
} 
.nivoSlider a.nivo-imageLink { 
    position:absolute; 
    top:0px; 
    left:0px; 
    width:100%; 
    height:100%; 
    border:0; 
    padding:0; 
    margin:0; 
    z-index:60; 
    display:none; 
} 
 
.nivo-slice { 
    display:block; 
    position:absolute; 
    z-index:50; 
    height:100%; 
} 
.nivo-caption { 
    position:absolute; 
    left:0px; 
    bottom:0px; 
    background:#000; 
    color:#fff; 
    opacity:0.7; /* Overridden by captionOpacity setting */ 
    width:100%; 
    z-index:89; 
} 
.nivo-caption p { 
    padding:5px; 
    margin:0; 
} 
.nivo-caption a { 
    display:inline !important; 
} 
.nivo-html-caption { 
    display:none; 
} 
 
.nivo-directionNav a { 
    position:absolute; 
    top:45%; 
    z-index:99; 
    cursor:pointer; 
} 
.nivo-prevNav { 
    left:0px; 
} 
.nivo-nextNav { 
    right:0px; 
} 
.nivo-controlNav a { 
    position:relative; 
    z-index:99; 
    cursor:pointer; 
} 
.nivo-controlNav a.active { 
    font-weight:bold; 
} 
</style>
<div id="slider">
 
<a href="URL-of-Post 1"><img src="Slide-X-Image-Address 1" alt="" title="Slide X Description [...] 1" /></a> 
 
<a href="URL-of-Post 2"><img src="Slide-X-Image-Address 2" alt="" title="Slide X Description [...] 2" /></a>
 
<a href="URL-of-Post 3"><img src="Slide-X-Image-Address 3" alt="" title="Slide X Description [...] 3" /></a>
 
<a href="URL-of-Post 4"><img src="Slide-X-Image-Address 4" alt="" title="Slide X Description [...] 4" /></a>
 
<a href="URL-of-Post 5"><img src="Slide-X-Image-Address 5" alt="" title="Slide X Description [...] 5" /></a>   
 
</div>
 
<br/> 
<br/>
 

Note : Replace URL-of-Post-X , Slide X Description [...] , Slide-X-Image-Address with your content.


Use width=300px and height=618px images for your slides.

Look at the code below:

<script src="http://ajax.googleapis.com/ajax/libs/jquery/1.4.2/jquery.min.js" type="text/javascript"></script>
<script src="http://nivo.dev7studios.com/scripts/nivo-slider/jquery.nivo.slider.pack.js" type="text/javascript"></script>
<script type="text/javascript"> 
$(window).load(function() { 
    $('#slider').nivoSlider(); 
}); 
</script>
<style> 
#slider { 
    position:relative; 
} 
#slider img { 
        position:absolute; 
    top:0px; 
    left:0px; 
    display:none; 
} 
#slider a { 
    border:0; 
    display:block; 
}
.nivo-controlNav { 
    position:absolute; 
    left:260px; 
    bottom:-42px; 
} 
.nivo-controlNav a { 
    display:block; 
    width:22px; 
    height:22px; 
    background:url(https://blogger.googleusercontent.com/img/b/R29vZ2xl/AVvXsEioxBO5nll_GF2CN46eDn4iyoizm8kSYCJIHz1clEfshznkdLZp76eOCO2BSeYBXzcaHuWrL4EQiOvVgW3hetMVv3G1AiTNP9FQzKemL0Szd7p5KSm6vG-U00INAO6PUa5fat2G7tJ7low/s400/bullets.png) no-repeat; 
    text-indent:-9999px; 
    border:0; 
    margin-right:3px; 
    float:left; 
} 
.nivo-controlNav a.active { 
    background-position:0 -22px; 
}
.nivo-directionNav a { 
    display:block; 
    width:30px; 
    height:30px; 
    background:url(https://blogger.googleusercontent.com/img/b/R29vZ2xl/AVvXsEisJNOlgl49RgLUlDoBfAHuJGa8UjC0_3_HXHW-kMQPK2I6D6AQiGfXwvUqtnA80CwtJymNFwbZh5qJH7spt6lUSA4gobztGcTyJhwr3LHg0ofyzUF6z37Vgq4stnvCGavxtOcT7brZwA8/s400/arrows.png) no-repeat; 
    text-indent:-9999px; 
    border:0; 
} 
a.nivo-nextNav { 
    background-position:-30px 0; 
    right:15px; 
} 
a.nivo-prevNav { 
    left:15px; 
}
.nivo-caption { 
    text-shadow:none; 
    font-family: Helvetica, Arial, sans-serif; 
    font-size:16px; 
    padding: 10px 0px; 
} 
.nivo-caption a { 
    color:#efe9d1; 
    text-decoration:underline; 
}
.clear { 
    clear:both; 
}
.nivoSlider { 
    position:relative; 
} 
.nivoSlider img { 
    position:absolute; 
    top:0px; 
    left:0px; 
} 
.nivoSlider a.nivo-imageLink { 
    position:absolute; 
    top:0px; 
    left:0px; 
    width:100%; 
    height:100%; 
    border:0; 
    padding:0; 
    margin:0; 
    z-index:60; 
    display:none; 
} 
 
.nivo-slice { 
    display:block; 
    position:absolute; 
    z-index:50; 
    height:100%; 
} 
.nivo-caption { 
    position:absolute; 
    left:0px; 
    bottom:0px; 
    background:#000; 
    color:#fff; 
    opacity:0.7; /* Overridden by captionOpacity setting */ 
    width:100%; 
    z-index:89; 
} 
.nivo-caption p { 
    padding:5px; 
    margin:0; 
} 
.nivo-caption a { 
    display:inline !important; 
} 
.nivo-html-caption { 
    display:none; 
} 
 
.nivo-directionNav a { 
    position:absolute; 
    top:45%; 
    z-index:99; 
    cursor:pointer; 
} 
.nivo-prevNav { 
    left:0px; 
} 
.nivo-nextNav { 
    right:0px; 
} 
.nivo-controlNav a { 
    position:relative; 
    z-index:99; 
    cursor:pointer; 
} 
.nivo-controlNav a.active { 
    font-weight:bold; 
} 
</style>
<div id="slider">
 
<a href="#"><img src="https://blogger.googleusercontent.com/img/b/R29vZ2xl/AVvXsEjzgGQDuZ0yueVnRsQF9r1CsXfMeVM-f8y_yzdjy9oZ95LLt6hwR2PnNnfmrms1-TAI1gu7M1uitloAjFhPueswhN3t_u0xgp6jEnDPLaCWfMjplV9sN9NXju7b6S3C-s8XRDhBXbf3cKYW/s800/Gazelle_-_antelope_%2528savanna.gif" alt="" title="Description Goes Here" /></a> 
 
    <img src="https://blogger.googleusercontent.com/img/b/R29vZ2xl/AVvXsEhWnyLIBTSFTjN1AnsiwXieCwJdBg33ZOurN-AmdLHjKDM9srILySpX3YKrs8OGRGLfr1sJ0ndYFXg8j2iU_zqFFfOyVrvAkfTyJpyY-Q98euxTipUV-lmxPTcgL49uYpRbJHqekz_wha-e/s800/Curious_Cat%252C_Siberian_Tiger.gif" alt="" title="You can add Description here or leave it blank as shown in the next image" /> 
 
    <img src="https://blogger.googleusercontent.com/img/b/R29vZ2xl/AVvXsEgSxCnV3TEz-Hunlh2QCeAJP3Pi2UY1LIeI0M7bTCPEHM6GLMApFx3LcuId4RM6FNYeeGLtZxWF5KsKHF3_f47TpNhNvWtwHT3h6lBzZBpJbTDlesr8iK_TzyVohkSJE__Ovk29KPaf4Mac/s800/Christmas_Cat.gif" alt="" /> 
 
 <img src="https://blogger.googleusercontent.com/img/b/R29vZ2xl/AVvXsEispYe8x9Qr3rp-h1cMGgAU1-SsPTqpimw4NqS2v0sAyW83Kv31xuzw5zSeA_QZVFQ8pgblgHZCp7MUxuYkghrlbm5oHiLd2fkrSwiXaW9kwgHG5E_NIdrSYsarFIYum6c8qhwMbCi_DrgB/s800/Leopard%252C_Africa.gif" alt="" title="You Can Add Description Here" /> 
 
<img src="https://blogger.googleusercontent.com/img/b/R29vZ2xl/AVvXsEh0LNDZy8cSV_V0RBpIGLibsngjdOJLvdhjzjnCSDteZVt4Zfnr8OUxMXEq0Qm_E_2jVoeW6lV1bMBh-INa3sf9KHNkN5x3hW9USmyQof1Diu9s1kR2yRpPLDv73PZwzbL5MwXWMNLEU9jj/s800/Three_tickets_to_the_North_.gif" alt="" title="#htmlcaption" /> 
 
 
</div>
 
 
<br/> 
<br/>


Download the new version of slide. Please click here.

Now you are done.

Cheers
Read More ...

0 comments