Showing posts with label Blog Tips and Tricks. Show all posts


LIVE PREVIEW

HOW TO ADD FLOATING SOCIAL SHARING BAR WIDGET?

First,
  1. Login to New Blogger Dashboard > Choose your Blog and Click the More Options Dropdown
  2. Select the Template > Click on Edit HTML > Proceed
  3. Check/Tick the Expand Template Widgets checkbox
Just follow 3 Simple steps,

THE JQUERY PLUGIN!

As always, it is jQuery based widget, and your blog must have the jQuery plugin. if your blog already have a latest jQuery plugin, then Ignore this step and directly follow the Second step.
If not add the below snippet code before </head> tag
<script type="text/javascript" src="http://ajax.googleapis.com/ajax/libs/jquery/1.7.2/jquery.js"></script>

THE SOCIAL SCRIPTS

This Code contains jQuery calls and Social button scripts and styles, and those are loads only in Post Pages which will decrease, load time when you on home or other pages. ;)
Add the below snippet code before </head> tag
<b:if cond='data:blog.pageType == &quot;item&quot;'>
<style type='text/css'>
/*<![CDATA[*/
 #w2bSocialFloat {clear:both;padding: 6px 0;display:block;background:#FFFFFF;}
 #w2bSocialFloat td{padding:4px;margin:0;border:none;}
 #w2bSocialFloat td iframe{max-width:82px;width:82px !important;}
 #w2bSocialFloat.w2bFloatSocial{position: fixed;top:0;z-index:9999999;border-bottom:1px solid #ccc;-webkit-box-shadow:0 1px 1px rgba(0,0,0,0.15);-moz-box-shadow:0 1px 1px rgba(0,0,0,0.15);box-shadow:0 1px 1px rgba(0,0,0,0.15);}
/*]]>*/
</style>
<script type="text/javascript">
/*<![CDATA[*/
jQuery(document).ready(function(b){var a=b("#w2bSocialFloat");a.wrap('<div id="w2bSocialPlaceholder"></div>').closest("#w2bSocialPlaceholder").height(a.outerHeight());a.width(a.outerWidth());w2bTopPos=a.offset().top;b("#w2bSocialFloat iframe[src*=plusone]").closest("div").css("max-width","82px");b(window).scroll(function(){b(this).scrollTop()>=w2bTopPos?a.addClass("w2bFloatSocial"):a.removeClass("w2bFloatSocial")})});
/*]]>*/
</script>
<script type="text/javascript" src="http://bloggerblogwidgets.googlecode.com/svn/trunk/w2b_blogger_pinit.js"></script>
<script type="text/javascript">
/*<![CDATA[*/
 // Twitter
 (function(a,b,c){var d=a.getElementsByTagName(b)[0];if(!a.getElementById(c)){a=a.createElement(b);a.id=c;a.src="//platform.twitter.com/widgets.js";d.parentNode.insertBefore(a,d)}})(document,"script","twitter-wjs");
 // Google + (plus)
 (function(){var a=document.createElement("script");a.type="text/javascript";a.async=true;a.src="https://apis.google.com/js/plusone.js";var b=document.getElementsByTagName("script")[0];b.parentNode.insertBefore(a,b)})();
 // Stumbleupon
 (function(){var a=document.createElement("script");a.type="text/javascript";a.async=true;a.src="https://platform.stumbleupon.com/1/widgets.js";var b=document.getElementsByTagName("script")[0];b.parentNode.insertBefore(a,b)})();
 // Digg
 (function(){var a=document.createElement("SCRIPT"),b=document.getElementsByTagName("SCRIPT")[0];a.type="text/javascript";a.async=true;a.src="http://widgets.digg.com/buttons.js";b.parentNode.insertBefore(a,b)})();
/*]]>*/
</script>
</b:if>

ADDING SOCIAL BUTTONS WIDGET

Let’s add the final Social horizontal bar widget code.
Add this code before <data:post.body/> tag.
<b:if cond='data:blog.pageType == &quot;item&quot;'>
<div id="w2bSocialFloat" class="w2bSocialFloat">
<table  width="100%" class="w2bSocialFloat">
 <tr>
  <td>
   <a href="https://twitter.com/share" class="twitter-share-button" expr:data-url="data:post.url" expr:data-text="data:post.title">Tweet</a>
  </td>
  <td>
   <iframe expr:src="&quot;//www.facebook.com/plugins/like.php?href=&quot; + data:post.url + &quot;&amp;send=false&amp;layout=button_count&amp;width=80&amp;show_faces=false&amp;action=like&amp;colorscheme=light&amp;font&amp;height=21&quot;" scrolling="no" frameborder="0" style="border:none; overflow:hidden; width:80px; height:21px;" allowTransparency="true"></iframe>
  </td>
  <td>
   <div expr:id="&quot;w2bPinit-&quot; + data:post.id" style="display: none;visibility: hidden;height: 0;width:0;overflow: hidden;" class="w2bPinitButton"> 
    <data:post.body/>
    <script type="text/javascript">
     w2bPinItButton({ 
      url:"<data:post.url/>", 
      thumb: "\<data:post.thumbnailUrl/>", 
      id: "<data:post.id/>", 
      defaultThumb: "https://blogger.googleusercontent.com/img/b/R29vZ2xl/AVvXsEjQcPV_gnFezdGoqTmcpxqw4P-yBPE9expclIRJFM-HKDpo54eRgCVLK2EUjzLQ9zWjQW9hIg7qLS7a4bWzzN3Qguv01JJkHhtnwAz5yo0ugntITvUHbMW1OhauQ5veOB8FFBvLXd-1RokN/s1600/w2b-no-thumbnail.jpg", 
      pincount: "horizontal" 
     }); 
    </script> 
   </div>
  </td>
  <td>
   <div class="g-plusone" data-size="medium" expr:data-href="data:post.url"></div>
  </td>
  <td>
   <su:badge layout="1" expr:location="data:post.url"></su:badge>
  </td>
  <td>
   <a class="DiggThisButton DiggCompact"></a>
  </td>
 </tr>
</table>
</div>
</b:if>

SAVE TEMPLATE!!!

Save the template and check your blog post pages, a working and awesome jQuery based floating social horizontal bar on your blog.
Hope this widget is helpful to you, Please leave your comments, and share this Widget.
Thanks to Raghav! for requesting this simple and awesome widget.

UPDATE :-

1. I FOUND THE TAG THREE TIMES?

If you found the <data:post.body/> three times, then you might using the Auto readmore hack,
Solution:
Search for below two lines
<b:if cond='data:blog.pageType == &quot;item&quot;'>
<data:post.body/>
Place the Widget code in between the two tags.

2. HOW TO CHANGE THE BACKGROUND COLOR OF HORIZONTAL BAR?

You can change the background color of Horizontal bar.
Solution:
In the Second step (The Social Scripts), search for
background:#FFFFFF;
and change the #FFFFFF with your own Hex Color.
Thanks to All.
Read More ...

1 comments


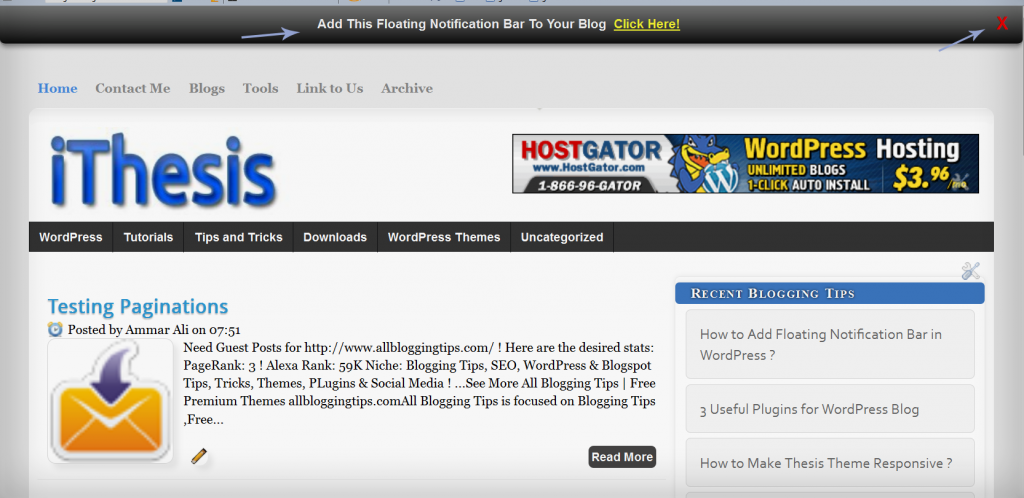
Add Cool Floating Notification bar in Blogger !

First  Always Back Up Your Template Before You Any Make Changes – How To Back Up A Blogger Template
  • Goto Blogger  => Design => Edit HTML
  • Next search for this code
<body>
  •   Just below it paste the following code,
<!-- Notification code start -->
<style type='text/css'>
#ut-sticky
{
background: #7d7e7d; /* Old browsers */
background: -moz-linear-gradient(top,  #7d7e7d 6%, #7d7e7d 9%, #0e0e0e 99%); /* FF3.6+ */
background: -webkit-gradient(linear, left top, left bottom, color-stop(6%,#7d7e7d), color-stop(9%,#7d7e7d), color-stop(99%,#0e0e0e)); /* Chrome,Safari4+ */
background: -webkit-linear-gradient(top,  #7d7e7d 6%,#7d7e7d 9%,#0e0e0e 99%); /* Chrome10+,Safari5.1+ */
background: -o-linear-gradient(top,  #7d7e7d 6%,#7d7e7d 9%,#0e0e0e 99%); /* Opera 11.10+ */
background: -ms-linear-gradient(top,  #7d7e7d 6%,#7d7e7d 9%,#0e0e0e 99%); /* IE10+ */
background: linear-gradient(top,  #7d7e7d 6%,#7d7e7d 9%,#0e0e0e 99%); /* W3C */
filter: progid:DXImageTransform.Microsoft.gradient( startColorstr=&#39;#7d7e7d&#39;, endColorstr=&#39;#0e0e0e&#39;,GradientType=0 ); /* IE6-9 */

border-bottom:2px solid #999;

color:#fff;
text-align: center;
margin:-12px auto;
padding-bottom:1px;
border-top: 1px solid #333;
height:38px;
font-size:13px;
position:fixed;
vertical-align: baseline; overflow:hidden;
z-index:999;
width:100%;
border-bottom-left-radius:6px;
border-bottom-right-radius:6px;
display:block;
font-weight: bold;
font-family: arial,&quot;Helvetica&quot;;
font-color:#fff;
 -moz-box-shadow: 0 2px 4px hsla(0,0%,0%,.35);
 -webkit-box-shadow: 0 2px 4px hsla(0,0%,0%,.35);
}
#ut-sticky:hover
{

background-color:#333;background-image:-moz-linear-gradient(top,#555555,#434343);background-image:-ms-linear-gradient(top,#555555,#434343);background-image:-webkit-gradient(linear,0 0,0 100%,from(#555555),to(#434343));background-image:-webkit-linear-gradient(top,#555555,#434343);background-image:-o-linear-gradient(top,#555555,#434343);background-image:linear-gradient(top,#555555,#434343);background-repeat:repeat-x;filter:progid:DXImageTransform.Microsoft.gradient(startColorstr=&#39;#555555&#39;,endColorstr=&#39;#434343&#39;,GradientType=0)

-webkit-transition:all 1.3s ease-in-out;-moz-transition:all 1.3s ease-in-out;-o-transition-duration:all 1.3s ease-in-out;transition:all 1.3s ease-in-out;

 -moz-box-shadow: 0 2px 4px hsla(0,0%,0%,.35);
 -webkit-box-shadow: 0 2px 4px hsla(0,0%,0%,.35);

}

#ut-button {background:#fff; padding:4px; color:black;text-shadow:0 -1px 0 rgba(255,255,255,0.25);background-color:white}

#ut-sticky p{line-height:5px; font-size:13px; text-align:center; width:95%; float:left;}
#ut-sticky p a{ text-decoration:underline; padding:4px; color:#FFFF33;}
.ut-cross{display:block; position:relative; right:15px; top:4px;float:right;}
.ut-cross a{font-size:18px; font-weight:bold; font-family:&quot;Arial&quot;; color:#FF0000; line-height:30px;}
.ut-cross, a:hover{color:#DDD; text-decoration:none;}

</style>
<div id='ut-sticky'>
<p style='padding-top:17px;'>Add This Floating Notification Bar To Your Blog <a class='ut-button' href='http://www.android-blogstuff.blogspot.com' target='_blank'>Click Here!</a></p>
<div class='ut-cross'><a href='javascript:hide_cross();'>X</a></div>
</div>
<script language='JavaScript'>
function hide_cross() {
crosstbox = document.getElementById(&quot;ut-sticky&quot;);
crosstbox.style.visibility = &#39;hidden&#39;;
}
</script>
<br/><br/>
<br/><br/>
<!-- End of Notification code, info - http://www.allbloggingtips.com -->
To Customize it
After adding above code just edit above HIGHLIGHTED text and link to your desire text.
I hope you enjoyed this cool Floating Notification bar widget. Do let me know if you face any problem.


Read More ...

0 comments

You can Install This Widget Easily in your Blog By Following These Simple Steps....

Before you edit any template it's better to keep a Backup..
So First Backup your Template. Now Go To Design>Edit Html>Select Expand Widgets...

Demo : Click Here 

Step 1 : The CSS You Need To Search The Following Piece Of Code By Pressing [Ctrl+F]

Read More ...

0 comments


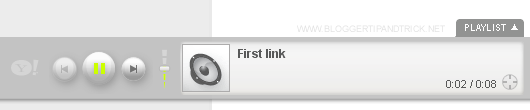
Yahoo Media Player is one of the easiest way to play audio files from your website or blog.It is very easy to embed into your site and only display when you click on the audio file name.Yahoo Media Player is not spend long time to load and someone can play all audio files of your website/blog using Play-list.
These are the main features of Yahoo Media Player:
  • Adds audio to your site with one line of HTML
  • Uses simple, easy-to-hack HTML instead of complicated proprietary markup, ushering in the REAL Media Web
  • Magical floating design never gets lost, is available when you need it, gets out of your way when you don't need it
  • Automatically finds all audio links on your page, turning your page into a playlist
  • Plays all your blog entries with a single button click
  • Allows you to put the play buttons where they belong: IN CONTEXT
  • Keeps the user in the page rather than sending them away to a media player
  • Picks up your images and adds them as cover art
  • Requires no download, install or maintenance
Yahoo Media Players
Follow these simple steps to embed Yahoo Media Player to your blog or website.
1.Login to your blogger dashboard--> Design - -> Edit HTML.
2.Scroll down to where you see </head> tag .
3.Copy below code and paste it just before the </head> tag .

<script type="text/javascript" src="http://mediaplayer.yahoo.com/js"></script>


4.Now save your template.
5.Go to Layout --> Page Elements.
6.Click on 'Add a Gadget'.
7.Select 'HTML/Javascript' and add the code given below (You can also add this code into Edit Html section of your Post Editor.):
<a href="DIRECT_URL_OF_YOUR_MP3-FILE">Name_Of_the_Mp3_File</a>
Note:
Replace "DIRECT_URL_OF_YOUR_MP3-FILE" with your .mp3 file direct url.
Replace "Name_Of_the_Mp3_File" with any name you like.
Look at the example given below:
<a href="http://mediaplayer.yahoo.com/example1.mp3">First link</a>
You can see more info about Yahoo Media Player from here : 
http://mediaplayer.yahoo.com/
.
Read More ...

0 comments


How To Add Cool Jquery Featured Slider to Blogger/Websites

1.Login to your blogger dashboard and go to Design --> Page Elements.

2.Click on 'Add a Gadget' on the sidebar.

3.Select 'HTML/Javascript' and add the one of code given below and click save.


<script src="http://ajax.googleapis.com/ajax/libs/jquery/1.4.2/jquery.min.js" type="text/javascript"></script>
<script src="http://nivo.dev7studios.com/scripts/nivo-slider/jquery.nivo.slider.pack.js" type="text/javascript"></script>
<script type="text/javascript"> 
$(window).load(function() { 
    $('#slider').nivoSlider(); 
}); 
</script>
<style> 
#slider { 
    position:relative; 
} 
#slider img { 
        position:absolute; 
    top:0px; 
    left:0px; 
    display:none; 
} 
#slider a { 
    border:0; 
    display:block; 
}
.nivo-controlNav { 
    position:absolute; 
    left:260px; 
    bottom:-42px; 
} 
.nivo-controlNav a { 
    display:block; 
    width:22px; 
    height:22px; 
    background:url(https://blogger.googleusercontent.com/img/b/R29vZ2xl/AVvXsEioxBO5nll_GF2CN46eDn4iyoizm8kSYCJIHz1clEfshznkdLZp76eOCO2BSeYBXzcaHuWrL4EQiOvVgW3hetMVv3G1AiTNP9FQzKemL0Szd7p5KSm6vG-U00INAO6PUa5fat2G7tJ7low/s400/bullets.png) no-repeat; 
    text-indent:-9999px; 
    border:0; 
    margin-right:3px; 
    float:left; 
} 
.nivo-controlNav a.active { 
    background-position:0 -22px; 
}
.nivo-directionNav a { 
    display:block; 
    width:30px; 
    height:30px; 
    background:url(https://blogger.googleusercontent.com/img/b/R29vZ2xl/AVvXsEisJNOlgl49RgLUlDoBfAHuJGa8UjC0_3_HXHW-kMQPK2I6D6AQiGfXwvUqtnA80CwtJymNFwbZh5qJH7spt6lUSA4gobztGcTyJhwr3LHg0ofyzUF6z37Vgq4stnvCGavxtOcT7brZwA8/s400/arrows.png) no-repeat; 
    text-indent:-9999px; 
    border:0; 
} 
a.nivo-nextNav { 
    background-position:-30px 0; 
    right:15px; 
} 
a.nivo-prevNav { 
    left:15px; 
}
.nivo-caption { 
    text-shadow:none; 
    font-family: Helvetica, Arial, sans-serif; 
    font-size:16px; 
    padding: 10px 0px; 
} 
.nivo-caption a { 
    color:#efe9d1; 
    text-decoration:underline; 
}
.clear { 
    clear:both; 
}
.nivoSlider { 
    position:relative; 
} 
.nivoSlider img { 
    position:absolute; 
    top:0px; 
    left:0px; 
} 
.nivoSlider a.nivo-imageLink { 
    position:absolute; 
    top:0px; 
    left:0px; 
    width:100%; 
    height:100%; 
    border:0; 
    padding:0; 
    margin:0; 
    z-index:60; 
    display:none; 
} 
 
.nivo-slice { 
    display:block; 
    position:absolute; 
    z-index:50; 
    height:100%; 
} 
.nivo-caption { 
    position:absolute; 
    left:0px; 
    bottom:0px; 
    background:#000; 
    color:#fff; 
    opacity:0.7; /* Overridden by captionOpacity setting */ 
    width:100%; 
    z-index:89; 
} 
.nivo-caption p { 
    padding:5px; 
    margin:0; 
} 
.nivo-caption a { 
    display:inline !important; 
} 
.nivo-html-caption { 
    display:none; 
} 
 
.nivo-directionNav a { 
    position:absolute; 
    top:45%; 
    z-index:99; 
    cursor:pointer; 
} 
.nivo-prevNav { 
    left:0px; 
} 
.nivo-nextNav { 
    right:0px; 
} 
.nivo-controlNav a { 
    position:relative; 
    z-index:99; 
    cursor:pointer; 
} 
.nivo-controlNav a.active { 
    font-weight:bold; 
} 
</style>
<div id="slider">
 
<a href="URL-of-Post 1"><img src="Slide-X-Image-Address 1" alt="" title="Slide X Description [...] 1" /></a> 
 
<a href="URL-of-Post 2"><img src="Slide-X-Image-Address 2" alt="" title="Slide X Description [...] 2" /></a>
 
<a href="URL-of-Post 3"><img src="Slide-X-Image-Address 3" alt="" title="Slide X Description [...] 3" /></a>
 
<a href="URL-of-Post 4"><img src="Slide-X-Image-Address 4" alt="" title="Slide X Description [...] 4" /></a>
 
<a href="URL-of-Post 5"><img src="Slide-X-Image-Address 5" alt="" title="Slide X Description [...] 5" /></a>   
 
</div>
 
<br/> 
<br/>
 

Note : Replace URL-of-Post-X , Slide X Description [...] , Slide-X-Image-Address with your content.


Use width=300px and height=618px images for your slides.

Look at the code below:

<script src="http://ajax.googleapis.com/ajax/libs/jquery/1.4.2/jquery.min.js" type="text/javascript"></script>
<script src="http://nivo.dev7studios.com/scripts/nivo-slider/jquery.nivo.slider.pack.js" type="text/javascript"></script>
<script type="text/javascript"> 
$(window).load(function() { 
    $('#slider').nivoSlider(); 
}); 
</script>
<style> 
#slider { 
    position:relative; 
} 
#slider img { 
        position:absolute; 
    top:0px; 
    left:0px; 
    display:none; 
} 
#slider a { 
    border:0; 
    display:block; 
}
.nivo-controlNav { 
    position:absolute; 
    left:260px; 
    bottom:-42px; 
} 
.nivo-controlNav a { 
    display:block; 
    width:22px; 
    height:22px; 
    background:url(https://blogger.googleusercontent.com/img/b/R29vZ2xl/AVvXsEioxBO5nll_GF2CN46eDn4iyoizm8kSYCJIHz1clEfshznkdLZp76eOCO2BSeYBXzcaHuWrL4EQiOvVgW3hetMVv3G1AiTNP9FQzKemL0Szd7p5KSm6vG-U00INAO6PUa5fat2G7tJ7low/s400/bullets.png) no-repeat; 
    text-indent:-9999px; 
    border:0; 
    margin-right:3px; 
    float:left; 
} 
.nivo-controlNav a.active { 
    background-position:0 -22px; 
}
.nivo-directionNav a { 
    display:block; 
    width:30px; 
    height:30px; 
    background:url(https://blogger.googleusercontent.com/img/b/R29vZ2xl/AVvXsEisJNOlgl49RgLUlDoBfAHuJGa8UjC0_3_HXHW-kMQPK2I6D6AQiGfXwvUqtnA80CwtJymNFwbZh5qJH7spt6lUSA4gobztGcTyJhwr3LHg0ofyzUF6z37Vgq4stnvCGavxtOcT7brZwA8/s400/arrows.png) no-repeat; 
    text-indent:-9999px; 
    border:0; 
} 
a.nivo-nextNav { 
    background-position:-30px 0; 
    right:15px; 
} 
a.nivo-prevNav { 
    left:15px; 
}
.nivo-caption { 
    text-shadow:none; 
    font-family: Helvetica, Arial, sans-serif; 
    font-size:16px; 
    padding: 10px 0px; 
} 
.nivo-caption a { 
    color:#efe9d1; 
    text-decoration:underline; 
}
.clear { 
    clear:both; 
}
.nivoSlider { 
    position:relative; 
} 
.nivoSlider img { 
    position:absolute; 
    top:0px; 
    left:0px; 
} 
.nivoSlider a.nivo-imageLink { 
    position:absolute; 
    top:0px; 
    left:0px; 
    width:100%; 
    height:100%; 
    border:0; 
    padding:0; 
    margin:0; 
    z-index:60; 
    display:none; 
} 
 
.nivo-slice { 
    display:block; 
    position:absolute; 
    z-index:50; 
    height:100%; 
} 
.nivo-caption { 
    position:absolute; 
    left:0px; 
    bottom:0px; 
    background:#000; 
    color:#fff; 
    opacity:0.7; /* Overridden by captionOpacity setting */ 
    width:100%; 
    z-index:89; 
} 
.nivo-caption p { 
    padding:5px; 
    margin:0; 
} 
.nivo-caption a { 
    display:inline !important; 
} 
.nivo-html-caption { 
    display:none; 
} 
 
.nivo-directionNav a { 
    position:absolute; 
    top:45%; 
    z-index:99; 
    cursor:pointer; 
} 
.nivo-prevNav { 
    left:0px; 
} 
.nivo-nextNav { 
    right:0px; 
} 
.nivo-controlNav a { 
    position:relative; 
    z-index:99; 
    cursor:pointer; 
} 
.nivo-controlNav a.active { 
    font-weight:bold; 
} 
</style>
<div id="slider">
 
<a href="#"><img src="https://blogger.googleusercontent.com/img/b/R29vZ2xl/AVvXsEjzgGQDuZ0yueVnRsQF9r1CsXfMeVM-f8y_yzdjy9oZ95LLt6hwR2PnNnfmrms1-TAI1gu7M1uitloAjFhPueswhN3t_u0xgp6jEnDPLaCWfMjplV9sN9NXju7b6S3C-s8XRDhBXbf3cKYW/s800/Gazelle_-_antelope_%2528savanna.gif" alt="" title="Description Goes Here" /></a> 
 
    <img src="https://blogger.googleusercontent.com/img/b/R29vZ2xl/AVvXsEhWnyLIBTSFTjN1AnsiwXieCwJdBg33ZOurN-AmdLHjKDM9srILySpX3YKrs8OGRGLfr1sJ0ndYFXg8j2iU_zqFFfOyVrvAkfTyJpyY-Q98euxTipUV-lmxPTcgL49uYpRbJHqekz_wha-e/s800/Curious_Cat%252C_Siberian_Tiger.gif" alt="" title="You can add Description here or leave it blank as shown in the next image" /> 
 
    <img src="https://blogger.googleusercontent.com/img/b/R29vZ2xl/AVvXsEgSxCnV3TEz-Hunlh2QCeAJP3Pi2UY1LIeI0M7bTCPEHM6GLMApFx3LcuId4RM6FNYeeGLtZxWF5KsKHF3_f47TpNhNvWtwHT3h6lBzZBpJbTDlesr8iK_TzyVohkSJE__Ovk29KPaf4Mac/s800/Christmas_Cat.gif" alt="" /> 
 
 <img src="https://blogger.googleusercontent.com/img/b/R29vZ2xl/AVvXsEispYe8x9Qr3rp-h1cMGgAU1-SsPTqpimw4NqS2v0sAyW83Kv31xuzw5zSeA_QZVFQ8pgblgHZCp7MUxuYkghrlbm5oHiLd2fkrSwiXaW9kwgHG5E_NIdrSYsarFIYum6c8qhwMbCi_DrgB/s800/Leopard%252C_Africa.gif" alt="" title="You Can Add Description Here" /> 
 
<img src="https://blogger.googleusercontent.com/img/b/R29vZ2xl/AVvXsEh0LNDZy8cSV_V0RBpIGLibsngjdOJLvdhjzjnCSDteZVt4Zfnr8OUxMXEq0Qm_E_2jVoeW6lV1bMBh-INa3sf9KHNkN5x3hW9USmyQof1Diu9s1kR2yRpPLDv73PZwzbL5MwXWMNLEU9jj/s800/Three_tickets_to_the_North_.gif" alt="" title="#htmlcaption" /> 
 
 
</div>
 
 
<br/> 
<br/>


Download the new version of slide. Please click here.

Now you are done.

Cheers
Read More ...

0 comments